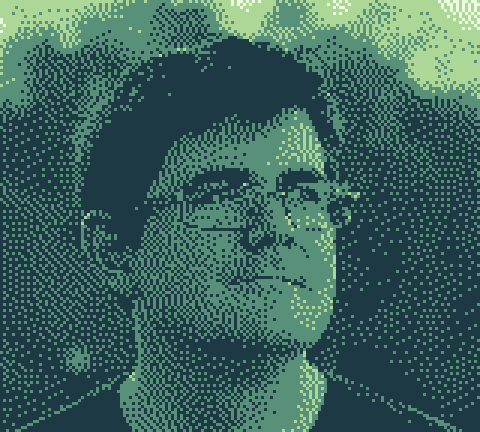
Recently I’ve been reading up on image dithering. It’s kind of cool. It’s a way of transforming an image into a smaller color space while still simulating as much color depth as possible. It has lots of practical uses – printing, displaying images on screens with limited colors, etc – but I realized it could also be used to inject images a heaping dose of gaming nostalgia. I couldn’t resist doing a quick proof of concept, so I’ve created a new web app that will transform an input image into what it may have looked like on an old gaming console by way of various dithering algorithms. For example, below you can see what I may have looked like on a Game Boy.
As you can probably infer from what I said previously, the app is actually pretty simple. All it’s doing is resizing the image and applying an image dithering algorithm to it.
There are various image dithering algorithms, but most work by trying to intelligently add noise to areas of an image where it doesn’t have the right colors in its reference palette. This noise can help simulate the missing colors. One place you may have seen image dithering is in gif files, which typically have small color palettes. In fact, the noise you see in many gif files is commonly due to the dithering algorithm that was applied to it. Without dithering, these files would suffer from color banding, which can be pretty ugly. In the video below you can view comparisons of what undithered vs dithered images look like given color palettes of various sizes.
As you can see, dithered images are able to look much better with far fewer colors. For the new app, I chose to use the popular Floyd-Steinberg dithering algorithm for most of the results (and used the wonderful RgbQuant.js library for this), and also used Ordered Dithering for a few other cases (I couldn’t find a good implementation of this algorithm, so I just wrote my own version based on what I read here). If you play around with the app, you’ll notice that the results with ordered dithering are much worse. I only included this option because it appears to be what the Game Boy Camera used. I’m not 100% sure on this, but the cross-hatch pattern found in many Game Boy Camera images is indicative of ordered dithering.
I should also note that while the new app can give you an idea of what an image may have looked like on an old gaming console, some of these filters wont be exactly 100% true to life. For example, the NES is capable of displaying around ~54 different colors, but for a single sprite it could only display 4 colors. So it wouldn’t really be realistic to expect an NES to display an image like this:

For it to display that image, it’d have to be composed of a bunch of tiny sprites that overlapped, and I’m not sure if there would be any limitations when doing that. So these filters are really just best guesses, and mostly just for fun.
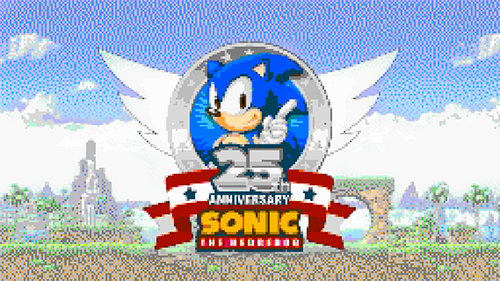
Lastly, I’ve also put in an option to create output without dithering. In some cases this produces a more realistic gaming result, and sometimes combining dithered and non-dithered images can give a better result, like this Sonic image: (I combined the dithered and undithered versions in photoshop, masking in the areas I liked from each version).
Honestly I’m not sure what practical use this app can have other than maybe a few minutes of fun, but I hope you enjoy it. If you’re interested in learning more about dithering algorithms check out this blog post on the subject, it covers in detail how several of the more popular ones work.
- Check the app out here: Old School Gaming Filters
- Create your own filter here: Palette Swap (this was actually my original idea, but it takes a little more work and I found pre-made filters were a little easier to work with)
Nice work, I will try your app to transform some pictures.
Great work on your game. I haven’t played it all the way through but what I’ve seen so far is very impressive.
This is awesome! Do you know if there is a filter like this that works with gifs?
Do you have the code?