Category Archives: Web Apps

Posts about web apps I’ve created or am working on.

ASCII Art Code Comments

Nick Kaye emailed me yesterday suggesting I add a feature to the Text ASCII Art Generator program which would allow for the output to be formatted in the form of a C-style programming comment. He even offered to write the code patch himself.

I thought the idea was really cool, and took him up on his offer. Anyway, the new feature is under the “More Options” link in the TAAG interface. Once it’s turned on, you’ll get output that’s formatted in the form of a programming comment. Here is an example:

/***
 *                      .___       
 *      ____   ____   __| _/ ____  
 *    _/ ___\ /  _ \ / __ |_/ __ \ 
 *    \  \___(  <_> ) /_/ |\  ___/ 
 *     \___  >\____/\____ | \___  >
 *         \/            \/     \/ 
 */

If anyone has any issues or additional suggestions let me know. And thanks again to Nick!

Quiz App Release

I have a beta version of my quiz app ready, you can check it out at one of the following links:

  • Quiz Guide – Same page shown a few entries ago, except this time the link to the Tcl/Tk quiz works.
  • Tcl/Tk Quiz – My first programming quiz for the PK app. I still plan on adding more questions, though I felt it was important to get a beta version out.

Right now all I have ready is a Tcl/Tk quiz. I’m guessing 90% of the people who read this will have no idea what Tcl/Tk is, but it’s a fun little scripting language that pops up in a lot of different places. Even if you aren’t familiar with it, the quiz will give you a feel for what the others will look like. I’ve set things up so that the quizzes themselves are JSON files, and are read in and generated on the fly by a single PHP page. The URL is set up to look like a directory, but it gets rewritten and pointed towards the PHP page (which will currently display the Tcl quiz no matter what, even if the quiz directory isn’t tcl-tk-basics).

Results Page

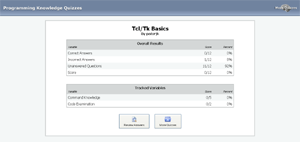
The quiz engine is currently set up to track multiple variables, with one variable acting as the “correctness” value to determine if a question is right or wrong. However, using a correctness variable can be turned off. The ability to track more than one variable allows the quiz to track different types of answers and to measure more than one thing. At the end of the quiz you’re presented with a table showing how you did in the various areas the quiz measured. Tracking multiple variables is how I imagine those online-dating site quizzes to work (the ones that will tell you about your personality, etc). I figured I’d keep my app as flexible as possible in case I wanted to do more creative things with it (though I have no plans to get into the online dating site world, I just want a flexible app).

Right now there’s only one type of question (multiple choice), though I hope to add more in the future. You also don’t lose points for incorrect answers. I’m still not sure if I want to add that ability in.

Also, while searching for icons to use in this program I found some pretty good resources, so I figured I’d share them here:

If you have any suggestions for the quiz app please let me know. I don’t think I’ve wasted as much time on any other app fretting about things that people probably wont care about. The app was actually partially re-written a couple times this past month. There’s was an ExtJS version, a version that used HTML tag generation instead of createElement (I’m still not sure what’s best), and lots of stuff I kept taking out and putting back in. However, I figured it was best to post a version up before I got old and gray.

App Interface Using ExtJS

Layout Demo

In the back of my mind I had been thinking about putting up some programming quizzes, similar to the ones I used to have on Visual Basic and C++. I was also thinking that it might be cool to have a quiz engine where users could create their own quizzes.

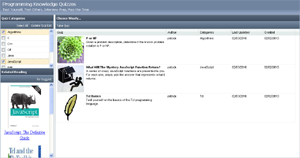
I’m not at that point yet, but this past weekend I decided to take the opportunity to try and learn ExtJS better and put together an interface for the app. You can see an image of the interface to the right or click here to see it in action. It’s pretty basic, but has all the functionality I think I’ll need for now.

The layout is broken into 3 sections. The top section is the header, to the left you can select quiz categories and get book recommendations, and on the right you get a list of quizzes. Hopefully the “Related Reading” panel doesn’t seem too commercial, as it was actually kind of fun to put together. I didn’t want to set myself up for having to write dozens of quizzes, so right now the interface only lists 3 quizzes (which I’ll hopefully have available soon).

Right now I’m in limbo about how complex I want this project to be. I’m not sure if I want users to be able to have accounts, and I’m not sure what data I’d want to store in a database. I’m also wondering if quizzes should be static html pages after they’re created. I’ll figure something out though.

Working with ExtJS was actually a lot of fun, and their online API documentation is fantastic. The library also seems to load rather quickly too. When I worked with Dojo, I was alarmed at the time the page took to load and how it looked while it loaded. I’m still a little bummed about the licensing for ExtJS, but I can live with certain things being GPL’d.

Playing Around With HTML5’s Canvas Element

After reading up a on HTML5’s canvas element, I decided to re-tool the game I was working on to work inside of a canvas element. This was because the canvas element provides some great drawing functionality. You can resize, rotate, crop, position and alter the pixels of images you use on the canvas.

FireFox

FireFox Appears to Have the Best Support for the Canvas Element
Photo By M i x y

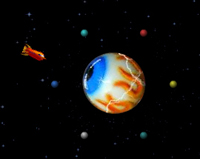
The game is still not done, however, I’ve uploaded another demo that shows the space ship and its main bad guy. You can use the arrow keys for movement and the “s” key to shoot. I changed the shoot key from the Space Bar to “s” because Opera was giving me issues when the Space Bar was pressed while the canvas had the focus.

Also, unlike last time, the game works best in FireFox, and basically sucks in everything else. Opera and Chrome can run the demo, but the frame rate is painfully slow. Since IE doesn’t support the canvas element yet, I’m using the JavaScript library Explorer Canvas to emulate it. Though you have to be using IE8 and be in “Quirks Mode” for it to work – and even then, the game is unplayably slow. Since the canvas element is part of the new standard, and one of its hyped uses is for creating games, I’m assuming / hoping that its performance is going to improve over the next couple of months in these browsers. However, since the canvas element is so cool, I’m still going to finish this game off even if it only works in FireFox.

For those of you interested in using the canvas element, Mozilla has a really good tutorial on it here, and there are some neat canvas game-themed tutorials here.

Lastly, and on a completely different note, I’ve written an update to the Is Someone Pretending To Be You Online? post I made a year ago. The update is at the bottom of the post and basically says the problem was due to a database error (which was a relief). I didn’t do an update right away since I didn’t want to embarrass the site owner.

Creating a JavaScript Space Ship Game

“What would be something neat to do in JavaScript?” – I kept asking myself that on Saturday. My fiance was away for the weekend and I was just kind of hanging out at home with the dog. Eventually I ended up thinking about possibly trying to do a side scroller game, like Mario Bros or Commander Keen, but since I had never written one before, I wasn’t sure. Finally, I came to the conclusion that it might be wiser to go for something a little easier first, and decided it might be cool to port my old “Intergalactic Odyssey” space ship game to JavaScript.

Old Intergalactic Oddyssey Game

Old Intergalactic Oddyssey Game

My goals here were to just see how feasible it would be to create an action game with moving sprites. I didn’t get very far, but I was able to create a space ship that could fly around and shoot lasers. I was able to get the graphics by decompiling my old SWF Flash file (I’ve long lost the source to the game). Also, the space ship artwork was done by fitz. I originally found the space ship via Google Images, though I did ask before I used it.

So far the main issue I’ve run into is that IE and FireFox aren’t reliable for smooth game play. The demo works best in Google’s Chrome and Opera’s Opera web browser. Though at this point I haven’t added any collision detection in, or any bad guys in, so there’s still a ways to go before I know if I’ll have a playable game.

One thing I didn’t realize when I started was that I could rotate images. I googled for a little bit and didn’t come up with anything, so I wound up creating images for each of the different rotations of the space ship. Though now that I’ve read up on it a little more, image rotation can apparently be done with the Canvas object in FF, Opera and Chrome, and with filters in IE. I suppose I’ll find out later which method is faster.

Lastly, the key capturing events are a little frustrating, since JavaScript doesn’t appear to remember when someone is holding the Up-arrow down if another key is pressed while its down. I’m still trying to figure out if there’s a way to get around this.

If you have any tips/suggestions, feel free to let me know.

Analyze Custom Keyboard Layouts

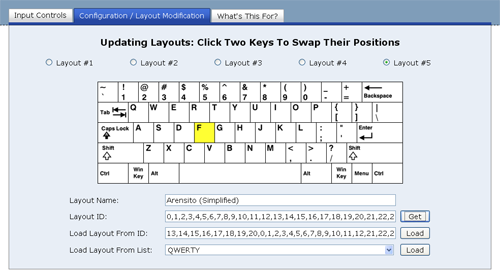
You can now create custom keyboard layouts and compare them against other layouts in the Keyboard Layout Analyzer. Below is a screen capture of the tab interface for the new feature.

Custom Layout Creator

Custom Layout Creator

Layouts 1-5 can now be configured any way you want them. So you can create your own layout and see how it stacks up against the more well known layouts, or you can make modifications to the existing ones and see how well your changes do.

Hopefully the interface is pretty straight forward. Clicking keys causes them to change places, and you can remember layouts you created with the use of the “Layout ID”.

I’ll be wrapping up my updates for this app pretty soon. I’m not sure what my next project will be, but I have a couple of ideas I’m considering.

Dvorak Was Probably Wrong About A Typist’s Fingers Traveling 20 Miles In A Day

I’ve added a new feature into the Keyboard Layout Analyzer that will let you know the distance your fingers travel while racing across different keyboard layouts. It’s interesting not only because it lets you know how far your fingers are crawling, but because it lets you test out one of Dvorak’s claims on why his layout was better than the QWERTY layout:

Dvorak estimated that the fingers of an average typist in his day traveled between 12 and 20 miles on a qwerty keyboard; the same text on a Dvorak keyboard would require only about one mile of travel.

Sources: [1] [2] [3] [4]

Below I have the results of several pieces of text I analyzed. The QWERTY, Dvorak, and Colemak layouts are compared against each other. The distance shown for each is just an estimate, but it appears as if the idea of typing 20 miles in a day is a little excessive. Also, the Dvorak layout only seems to give you a 40%-45% improvement over the QWERTY layout when it comes to the distance you type.

Caption

Keyboard Monument
(It uses a QWERTY layout)
Photo By jasoneppink (cc)

George Orwell’s 1984 book, Chapter 1:

QWERTY – 0.5629 miles
Dvorak (Simplified) – 0.3107 miles
Colemak – 0.2935 miles

Christopher Nolan’s The Dark Knight Movie Script:

QWERTY – 3.0929 miles
Dvorak (Simplified) – 1.8838 miles
Colemak – 1.8497 miles

Jared Diamond’s The Curse of Qwerty article:

QWERTY – 0.3852 miles
Dvorak (Simplified) – 0.2173 miles
Colemak – 0.1938 miles

Steve Yegge’s Pinocchio Problem blog post:

QWERTY 0.7167 miles
Dvorak (Simplified) 0.4115 miles
Colemak 0.3619 miles

My Previous Post:

QWERTY – 0.0412 miles
Dvorak (Simplified) – 0.0233 miles
Colemak – 0.0211 miles

The algorithm for determining the distances is still being tweaked at the moment, so the distances may change in the future, however, it wont be dramatic. The biggest thing I have left to do is to factor in the pressing of the “shift” keys when an upper case letter is typed.
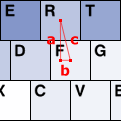
c is the distance between the F and R keys.

"c" is the distance between the "F" and "R" keys

To the left you can see a diagram showing how the distance between two keys is calculated. The center coordinate of each key is known, so the Pythagorean theorem (c² = a² + b²) is used to calculate the distance between keys. The horizontal distance between the center of two letter keys that are next to each other is said to be 1.9 cm [reference]. This is 40 pixels in my set up. Therefore, I calculate the distance in pixels, and then convert it to meters by dividing by 40 and then multiplying by 0.019. I’m probably currently doing way more calculations than I should be doing, and that will be optimized later, but for now this is how its currently working.

If you’re skeptical about the distances you get back from the program, you can also try Colemack.com‘s Layout Comparison Tool, which also produces estimates on typing distances. They’ll be slightly different from what I display, but they’ll be within the same ballpark. As an aside, somehow I missed seeing that app until recently, but at least our programs have their divergences.

Let me know if you have any issues with the distance calculator. Also, I’ll hopefully have some more updates to the Keyboard Layout Analyzer coming within the next week or two.
New Keyboard Layout Analyzer, Less Lines of Code

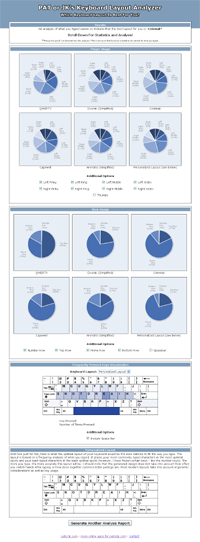
I’ve uploaded a new version of my Keyboard Layout Analyzer. You can see a full screen capture of the output page below. The new version has a layout similar to the one I discussed in my last post, and has a different chart set up, as well as a hand full of other small new features.

The New Layout For Keyboard Layout Analyzer Output

The New Layout For Keyboard Layout Analyzer Output

This new version is essentially a complete re-write of the old version. I had been making mental notes of features I thought would make the program a lot more useful, and after thinking about how I’d implement these new features, I realized I’d be better off just re-writing the application instead of modifying the old one.

This re-write was also a way for me to “pay down” my “technical debt” (I think I like that term), as I was able to more efficiently implement certain things to make them a lot more flexible. When I write stuff for fun, a lot of the time I just go with the first or second implementation I think of and then get to work. This re-write will probably serve as a good lesson learned, since the re-write was a little more painful than I expected. Only one of the new features that I thought up is in the program right now (the new chart set up), I didn’t have time to get to the rest of them, though I hope to implement them in the next couple of weeks.

Here’s an overview of what’s in this version:

  • Updated interface.
  • Able to view charts of different layouts all at once.
  • Able to select what pieces of information you want to factor into the charts.
  • Addition of the Capewell and Arensito (Simplified) layouts. However, this set up isn’t final. These layouts will still be in the next version, but the options will be a little different.
  • “Personal Layout” factored into the statistics.
  • A layout recommendation is made based on what you typed.

This new implementation also consists of 26% fewer lines of code. 🙂

This new version was tested out in Firefox 3.0 and 3.5, Chrome, and IE8. Unfortunately, the new IE8 messed up my install of IE6Eolas, so I’m not sure how the app works in IE6 or IE7. Oh, and I hate to rehash the cliché of bashing IE, but IE8 is actually a lot slower than IE6 and IE7 when it comes to executing JavaScript. Enough so that I was actually a little dismayed. I had been hearing mostly positive things about IE8, but I just didn’t see anything that I thought was that impressive.

Anyway, if you have any suggestions for the Keyboard Layout Analyzer or find any bugs in it let me know.

The Evolving Layout Of The Typing Speed Test

Coming up with a good looking, easy-to-use design is hard. Sometimes I feel like I spend more time trying to design an application’s layout than I do programming its back end, and most of the time the resulting layout isn’t that impressive. I think I’m just better at creating functionality than I am at making something that looks pretty. However, no one’s going to look at something if it looks like crap, and people tend to give applications more of a fair shake if they look nice, so I think the time I spend trying to become a better designer is worth it.

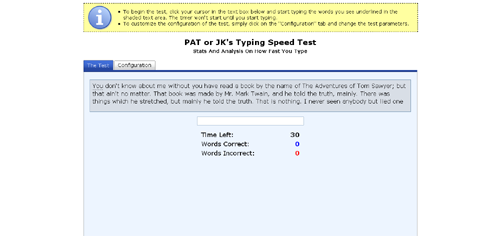
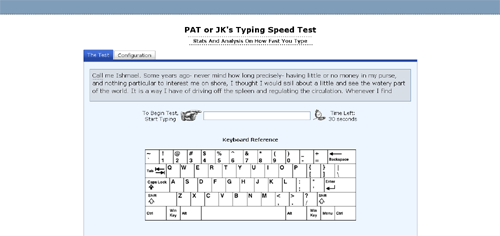
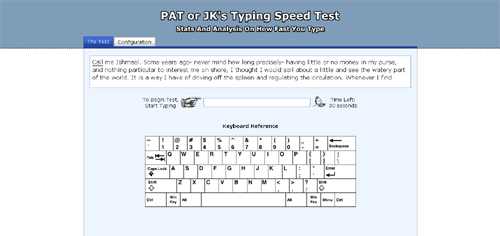
Recently I’ve taken to trying to improve the look of my Typing Speed Test. Below you can see the initial design, a design I put up last month, and the most recent design, which I put up this past weekend.

Initial Design

Initial Design

Second Layout

Second Layout

Current Layout

Current Layout

I made the initial design with the idea of keeping things as simple as possible, however, in retrospect, the page looks kind of unbalanced and the big yellow explanation box at the top kind of comes off as a little bit of an eye sore. The second layout was made with the aim of being a bit more stylish. I got ride of the yellow explanation box, threw in some small gifs, added a keyboard reference, and put in a header bar to make it seem a little less plain.

The third, and current layout, was made with the aim of trying to make something that, in my mind, looked good. I don’t think I quiet accomplished that, but I think I came up with something better than what I had. The interface seems cleaner and more balanced, and I like the additional color at the top of the page. The only thing I’m not sure I like are the header images, they seem a little cheesy. So I’ll probably keep tweaking the layout. My goal is to come up with something I can re-use on future (and existing) applications.